Sweet Potato and Broccoli Tray Bake with Sesame Ginger Sauce

Jump To Recipe

This sweet potato tray bake is simple and wholesome with vibrant vegetables and a boldly flavorful sesame ginger sauce. It’s a tasty back to school dinner that’s easy to prepare and quick to clean up. Naturally vegan and gluten free!


sweet potato and broccoli tray bake with sesame ginger sauce

This is a sponsored post written by me on behalf of O3 Superfoods. I’ve greatly enjoyed developing a full year of flax seed butter recipes and photos for this essential company. Thank you so much for the support!


Can you feel that crispness in the air? The fall equinox is only days away, kids are back at school and it’s time to get the cozy sweaters out. This is the time of year when it seems like our “to-do” list is getting longer while the days are getting shorter. If you’re swamped, juggling school and work duties, it’s handy to have a few recipes in your back pocket that tick all the boxes. For me, this includes:

  1. Great for meal prep

  2. Easy to clean up

  3. Low fuss

  4. Super flavorful

  5. Healthy

All this awesomeness is in a vegetable tray bake. The beautiful thing about tray bake dinners is that it bakes all in one pan, just like the name says! You can save even more time by chopping up your veggies in advance or purchasing them precut. Then all that’s left to do is whisk together the 5 minutes sauce, toss it with the vegetables and let the oven do the work!

sweet potato and broccoli tray bake with sesame ginger sauce

You might be wondering how an easy vegan sheet pan dinner can have mouthwatering flavor with minimal effort. The secret is the sauce.

Starting with a super flavorful sauce is what brings humble vegetables to life, and broccoli is a champ when it comes to soaking up sauce. Roasted with creamy sweet potatoes and crisp bell pepper, the bold flavors practically sing.

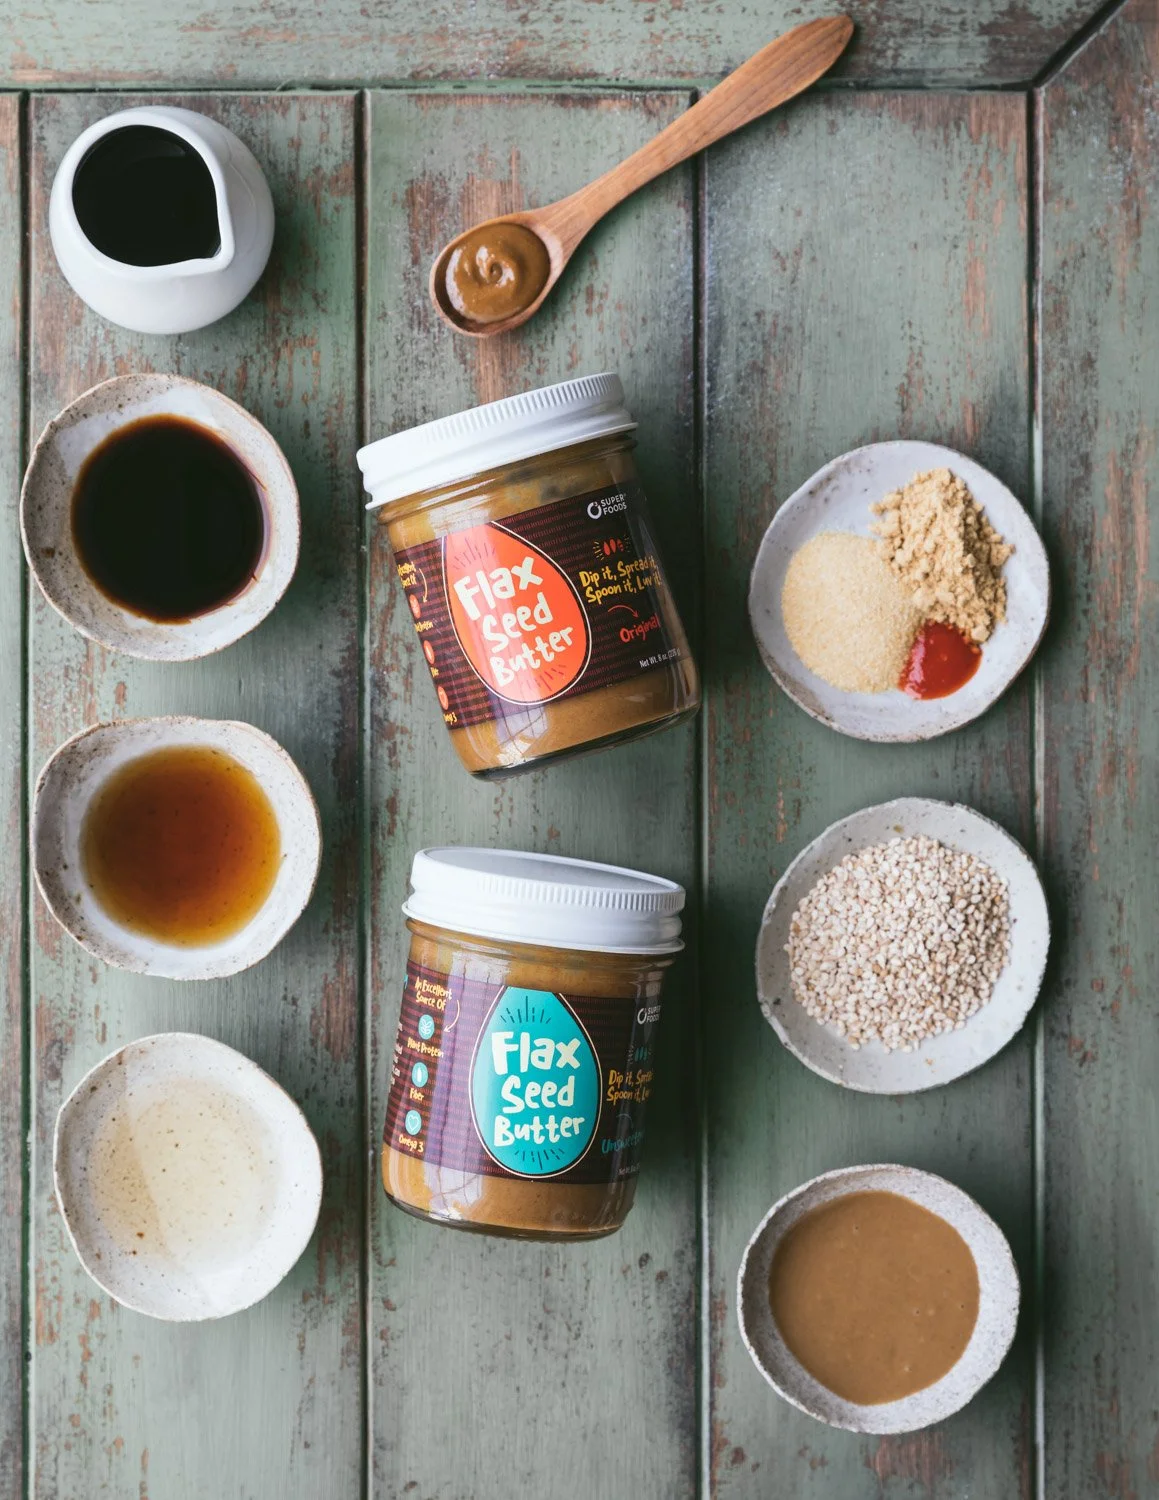
The ingredients and their amounts of the Sesame Ginger Sauce are listed in the recipe card and step-by-step instructions below, but let’s take a closer look at each one.

Coconut aminos- Made from the sap of the coconut tree, coconut aminos are sweet and salty with a unique umami flavor.

Tamari- My favorite gluten-free alternative to soy sauce. It’s a bit less salty with a deeper flavor.

Pure sesame paste- which is different from tahini. It’s made from roasted, not raw, sesame seeds and has a powerful toasted sesame flavor.

Flax seed butter-This optional ingredient helps thicken the sauce while adding a hit of Omega-3. Read all about the health benefits of flax seed butter here.

Rice vinegar- adds a bright zing and balances the saltiness.

Maple syrup- for a touch of sweetness.

Sesame seeds- for texture and additional sesame flavor.

Ground ginger- gives the sauce a gingery kick.

Garlic powder- for well-rounded umami flavor.

Sriracha- to make it spicy but not too spicy.

Since all these ingredients are pantry friendly, I keep them on hand so I can make this recipe without going to the grocery store. While the broccoli / sweet potato combo is the bomb, you can use up leftover veggies that may be hanging around in your fridge. Just be sure to use the same quantiles so you have enough sauce and so they don’t overcrowd the tray.

sweet potato and broccoli tray bake with sesame ginger sauce

Tips for becoming a tray bake pro:

  • Peel and cut your sweet potatoes into small ½” cubes. Small bite-sized pieces will cook faster than large chunks. This cuts way back on cooking time (Roasted potatoes can take up to an hour!) and helps all the vegetables cook at the same rate.

  • Toss until well coated. You want all sides of the vegetables to be coated in that flavorful sauce! 

  • Don’t overcrowd the pan. Tumble the veggies onto the pan and use your mixing spoon to spread them out. This way they will roast instead of steam. I use a half sheet pan which is about 18x13”

  • Line your baking tray with parchment paper- for quick and easy clean-up.

  • Prep ahead of time. Cut your vegetables up to 3 days ahead or buy them precut. The sauce only takes 5 minutes to make but you can prepare it in advance too.

sweet potato and broccoli tray bake with sesame ginger sauce

Here’s everything you need to know to make Sweet Potato and Broccoli Tray Bake with Sesame Ginger Sauce

ingredients for sesame ginger sauce

Ingredients for the Sesame Ginger Sauce

  • ¼ cup (2 oz.) of coconut aminos

  • 1 tablespoon of tamari

  • 1 tablespoon of pure sesame paste

  • 1 tablespoon of O3 Superfoods flax seed butter (optional)

  • 1 tablespoon of rice vinegar

  • 1 tablespoon of maple syrup

  • 1 tablespoon of sesame seeds (plus more for sprinkling)

  • 1 teaspoon of ground ginger

  • 1 teaspoon of garlic powder (or granules)

  • ¼ teaspoon of sriracha (more for spicy)


Sweet Potato and Broccoli Tray Bake with Sesame Ginger Sauce ingredients

Ingredients for the vegetables

  • 4 cups (600 g) orange-fleshed sweet potatoes (about 2 medium) peeled and diced into ½” cubes

  • 1 small red bell pepper, thinly sliced

  • 1 bunch of broccoli or broccolini, sliced


How to make Sweet Potato and Broccoli Tray Bake / makes 4 servings

1. Preheat oven to 425 F (220 C / gas mark 7). Line a rimmed baking tray with parchment paper.

2. Make the sauce- Whisk, in a small mixing bowl, all the ingredients for the Sesame Ginger Sauce. The tahini will look separated and curdled to start with but will blend into a smooth sauce as you mix.

3. Prepare the vegetables- Peel and dice the sweet potatoes into ½” cubes. (so they cook at the same rate as the broccoli and peppers) Thinly slice your pepper and cut the broccoli into manageable bite size pieces.

4. Toss the vegetables- in a large mixing bowl with the sesame ginger sauce. See that all the veggies are well coated.

5. Spread the vegetables- on your baking tray with the yams settled at the bottom.

6. Bake- for 30 minutes. Check to see if the sweet potatoes are fork tender. Slide the tray back into the oven for 5 more minutes if needed.

7. Serve- Sprinkle sesame seeds over the top and serve with your favorite rice.


Note: The Sesame Ginger Sauce makes a quick and flavorful marinade for tofu or tempeh.

Storage: Store leftovers in the fridge for up to 5 days.

sweet potato and broccoli tray bake with sesame ginger sauce

I hope you love this simple yet flavorful sweet potato tray bake. If you’re looking for more weeknight-friendly dinners, I got you covered with these quick and flavorful recipes:

Easy Vegan Cheese Sauce for the tastiest mac and cheese.

Savory Chickpea Nettle Pancakes when savory breakfast for dinner hits the spot.

Smokey Tempeh Tacos because every day is Taco Tuesday! Top with Sweet Lime Slaw for extra crunch.

Cauliflower Alfredo has all the flavor without heavy cream or butter. Sprinkle with Easy Vegan Parmesan Cheese Recipe.

Strawberry Spinach Salad with Maple Balsamic Dressing for a scrumptious meal-in-one salad everyone will love.

sweet potato and broccoli tray bake

If you like this recipe, please leave a 5-star rating/comment below. I always love hearing about your creations! And be sure to follow along on Instagram, and Pinterest for even more deliciousness!

Yield: 4 Servings
Author: Carol Clayton
Sweet Potato and Broccoli Tray Bake with Sesame Ginger Sauce

Sweet Potato and Broccoli Tray Bake with Sesame Ginger Sauce

This sweet potato tray bake is simple and wholesome with vibrant vegetables and a boldly flavorful sesame ginger sauce. It’s a tasty back to school dinner that’s easy to prepare and quick to clean up. Naturally vegan and gluten free!
Prep time: 15 MinCook time: 30 MinTotal time: 45 Min

Ingredients

For the Sesame Ginger Sauce
For the vegetables

Instructions

  1. Preheat oven to 425 F (220 C / gas mark 7). Line a rimmed baking tray with parchment paper.
  2. Make the sauce- Whisk, in a small mixing bowl, all the ingredients for the Sesame Ginger Sauce. The tahini will look separated and curdled to start with but will blend into a smooth sauce as you mix.
  3. Prepare the vegetables- Peel and dice the sweet potatoes into ½” cubes. (so they cook at the same rate as the broccoli and peppers) Thinly slice your pepper and cut the broccoli into manageable bite size pieces.
  4. Toss the vegetables- in a large mixing bowl with the sesame ginger sauce. See that all the veggies are well coated.
  5. Spread the vegetables- on your baking tray with the yams settled at the bottom.
  6. Bake- for 30 minutes. Check to see if the sweet potatoes are fork tender. Slide the tray back into the oven for 5 more minutes if needed.
  7. Serve- Sprinkle sesame seeds over the top and serve with your favorite rice.

Notes

The Sesame Ginger Sauce makes a quick and flavorful marinade for tofu or tempeh.

Storage: Store leftovers in the fridge for up to 5 days.


For step-by-step instructions and photos, see blog post!

Nutrition Facts

Calories

219.81

Fat (grams)

4.18

Sat. Fat (grams)

0.56

Carbs (grams)

40.41

Fiber (grams)

6.15

Net carbs

34.25

Sugar (grams)

10.51

Protein (grams)

5.87

Sodium (milligrams)

686.76

Cholesterol (grams)

0

Nutritional information is provided as a courtesy and is an estimate only. This information comes from online calculators.

Did you make this recipe?
Tag @vegeta.full on instagram and hashtag it # feedpeopleplants

Vegan Carrot Dogs

Jump To Recipe

Surprise! These vegan carrot dogs look and taste just like traditional hot dogs! They’re smokey sweet, full of umami flavor, and made with wholesome ingredients you can feel good about. Perfect for your next BBQ or family gathering!


vegan carrot dogs in buns

I first stumbled on the idea of carrot dogs when planning a veg cookout for Sisterland Farms last summer. Farm owner, Jenson, was stoked on the idea which used large quantities of carrots, a vegetable that seems to magically multiply underground. After some jockeying with the recipe, I pulled a not unrealistic carrot dog from the pan, crossed my fingers, and served it to a gathering of hungry campers. It was a huge hit. No one could believe a carrot could taste so much like a hot dog.

Since then, and many requests for carrot dogs later, I have crafted a recipe that ticks all the boxes. It must be deeply flavorful and doable in under an hour, indoor or outdoor friendly, and pass the omnivore test. In other words, this carrot dog must look and taste like a hot dog. And it does!

vegan carrot dogs in buns with condiments

What the heck is a carrot dog?

I’ve been asked this many times, usually from a place of curiosity and occasionally from an offended frankfurt eater. Simply put, a carrot dog is a vegan hot dog made from whole carrots. Carrots are long and skinny just like hot dogs. They are sturdy and stand up to long marinating times. They also are naturally sweet and similar in flavor to their highly processed cousins.

You can have these healthy hot dogs on the table in under an hour. They are also very handy for large gatherings because you can make multiple batches ahead of time and let them marinate in the fridge until grilling time.

If you are looking for a super healthy alternative to plant-based franks or are just curious, I invite you to dive into the world of carrot hot dogs and prepare to have your mind blown!

vegan carrot dogs in buns

What do carrot hot dogs taste like?

Carrot hot dogs taste smokey, slightly sweet, and full of umami flavor just like hot dogs. Once cooked until soft, marinated, and pan-fried, they have a mouthfeel similar to firm roasted carrots.

Because carrots are fat-free they are less filling than traditional or plant-based franks. This is a bonus because you’ll have room for another dog or side dishes, not to mention dessert!

Can this carrot dog recipe be made oil-free?

Absolutely! The carrots are fully cooked and marinated before pan-frying. To make them oil-free, skip the pan-frying step and enjoy them directly from the cooled cooking liquid.

Can I grill them like traditional hot dogs?

You bet! Once the carrot dogs are cooked and marinated, skip the pan-frying step and brown them on a well-oiled grill.

vegan carrot dogs in buns with condiments

Tips and tricks for fool-proof carrot dogs

  1. Cut your carrots a little bigger than your buns. My favorite buns are a little less than 6” long, so I cut the carrots into 6” lengths. But your buns may be shorter or longer. Measure the length of your buns and cut the carrots slightly longer. This way you’ll get a mouthful of carrot dog and bun, loaded with condiments, in every bite.

  2. Peel your carrots to be similar in width from top to bottom. As we know, carrots are fat at one end and skinny at the other, while hot dogs are the same width from top to bottom. To make your carrots a similar shape to hot dogs, use a vegetable peeler to trim the extra thickness off the fat end. Just for fun you can even round each end, frankfurter style!

  3. Put a lid on it. Cover the pan with a lid during simmering to keep the sauce from over-reducing. You want the carrots to marinate in the sauce as they cook.

  4. Cook until soft but not mushy. No one likes a mushy carrot. Check to see that your carrots are soft and fork-tender but not mushy or falling apart after they have been simmering for 10 minutes. Once they are close to this stage, check every minute to avoid the tragedy of overcooking.

  5. Let the carrots cool in the sauce. Please don’t skip this step! The longer the carrots are left to marinate in the sauce, the more flavorful they will be. If I’m cooking for a crowd, I’ll even make a large batch ahead of time and let them marinate in the fridge, fully cooked, for up to 3 days.

vegan carrot dogs in buns

Don’t toss the sauce! That leftover sauce makes a killer marinade for tempeh and tofu. In fact, my meat-loving son grabs tempeh cooked in carrot dog sauce over hamburger!

Serving suggestions:

Nothing beats a classic vegan hot dog in a rustic bun loaded with all your favorite toppings. (My favorite bun is from our local Buena Luz Bakery.)

They’re also delicious:

vegan carrot dogs in buns

Carrot dogs don’t just look and taste like hot dogs they’re also

  • Healthy

  • Low-fat

  • Gluten-free

  • Full of fiber

  • Unprocessed

  • Made with clean ingredients


Keep scrolling for step-by-step instructions and photos!

ingredients for vegan carrot dogs

Ingredients for Vegan Carrot Dogs

 Makes 6 Carrot Dogs

  • 6 large carrots, peeled and cut to 6” lengths

  • ½ cup (8 oz) of vegetable broth

  • ¼ cup (2 oz) of tamari

  • ¼ cup (2oz) of apple cider vinegar

  • 2 tablespoons of maple syrup

  • 1 tablespoon of Dijon mustard

  • 1 teaspoon of concentrated hickory liquid smoke (I highly recommend this brand!)

  • 1 teaspoon of garlic powder

  • 1 teaspoon of onion powder

  • 2 tablespoons of olive oil for pan-frying


How to make Vegan Carrot Dogs

1. Prep the carrots- Cut the skinny end off your carrot so that it’s a little longer than the bun. Then peel each carrot so that it’s similar in width from top to bottom. Round off the ends if you like.

2. Make the sauce- Whisk all the other ingredients, except the oil, in a small mixing bowl.

3. Pour the sauce into an 8-10” saucepan and arrange your carrots on the bottom. The sauce will come halfway up the sides of the carrots.

1. Cook the carrots- Cover the pan with a lid and bring to a boil. Reduce to simmer and cook for 15 minutes, turning the carrots over halfway through. A foam will develop and that’s totally okay. After 10 minutes check to see if they are soft and fork-tender but not mushy and falling apart. Once the carrots are close to fully cooked, check on them every minute. Extra-large carrots may take up to 20 minutes.

2. Marinate- Remove from the heat (and remove the lid). Then let the carrots cool for at least 20 minutes in the sauce. If you plan to pan-fry or grill them at a later date, store the carrots and the sauce together, in a bag in the fridge.

3. Pan-fry- Pour the olive oil into an 8-10” frypan over medium-high heat. Let the pan heat to the point where a splash of water makes a sizzling sound. Arrange your carrots in the pan and let them cook, undisturbed, until golden brown on the bottom, about 3 minutes. Then flip them over and brown the other side. You can also grill them on a well-oiled grill.

4. Serve- tuck into a rustic bun and top with all your favorite condiments!

Storage:

Store carrot dogs and buns separately in the fridge for a week.

vegan carrot dogs in buns

If you like this recipe, please leave a 5-star rating on the recipe card below. Your ratings and comments mean the world to me, thank you!

And just for you, receive a gorgeous FREE e-cookbook by subscribing to my newsletter! Click here for delicious weekly recipes and your e-cookbook.

Yield: 6 carrot dogs
Author: Carol Clayton
Vegan Carrot Dogs

Vegan Carrot Dogs

Surprise! These vegan carrot dogs look and taste just like traditional hot dogs! They’re smokey sweet, full of umami flavor, and made with wholesome ingredients you can feel good about. Perfect for your next BBQ or family gathering!
Prep time: 10 MinCook time: 25 MinInactive time: 20 MinTotal time: 55 Min

Ingredients

Instructions

  1. Prep the carrots- Cut the skinny end off your carrot so that it’s a little longer than the bun. Then peel each carrot so that it’s similar in width from top to bottom. Round off the ends if you like.
  2. Make the sauce- Whisk all the other ingredients, except the oil, in a small mixing bowl.
  3. Pour the sauce into an 8-10” saucepan and arrange your carrots on the bottom. The sauce will come halfway up the sides of the carrots.
  4. Cook the carrots- Cover the pan with a lid and bring to a boil. Reduce to simmer and cook for 15 minutes, turning the carrots over halfway through. A foam will develop and that’s totally okay. After 10 minutes check to see if they are soft and fork-tender but not mushy and falling apart. Once the carrots are close to fully cooked, check on them every minute. Extra-large carrots may take up to 20 minutes.
  5. Marinate- Remove from the heat (and remove the lid). Then let the carrots cool for at least 20 minutes in the sauce. If you plan to pan-fry or grill them at a later date, store the carrots and the sauce together, in a bag in the fridge.
  6. Pan-fry- Pour the olive oil into an 8-10” frypan over medium-high heat. Let the pan heat to the point where a splash of water makes a sizzling sound. Arrange your carrots in the pan and let them cook, undisturbed, until golden brown on the bottom, about 3 minutes. Then flip them over and brown the other side. You can also grill them on a well-oiled grill.
  7. Serve- tuck into a rustic bun and top with all your favorite condiments!

Notes

Storage:

Store carrot dogs and buns separately in the fridge for a week.


For step-by-step instructions and photos, see blog post!

Nutrition Facts

Calories

60.7

Fat (grams)

0.27

Sat. Fat (grams)

0.03

Carbs (grams)

13.02

Fiber (grams)

2.3

Net carbs

10.73

Sugar (grams)

7.86

Protein (grams)

1.91

Sodium (milligrams)

698.98

Cholesterol (grams)

0

Nutritional information is provided as a courtesy and is an estimate only. This information comes from online calculators.

Did you make this recipe?
Tag @vegeta.full on instagram and hashtag it # feedpeopleplants

Homemade Vegan Potato Gnocchi

Jump To Recipe

Learn how to make Homemade Vegan Potato Gnocchi like an Italian grandmother! This impressive dish is made from just 5 ingredients and tastes light, pillowy, and flavorful. Best of all it’s freshly made without any preservatives, eggs, or gluten!


homemade vegan potato gnocchi on a plate

I was recently travelling in Croatia for a photography workshop and stumbled upon the cutest gnocchi board in a charming outdoor market. Those little ridges were calling my name from a basket of jumbled wooden kitchen goods. So, I scooped it up and took it home. Gnocchi and I have become well acquainted since then and I’m excited to share this adventure (and recipe) with you!

What I’ve learned is that you can make swoon worthy gnocchi, or you can make quick/easy gnocchi. But I’ve yet to encounter effortless homemade vegan gnocchi that is light, pillowy soft, and impossible to resist. That being said, if you follow the steps I’ve laid out in this recipe, gnocchi nirvana is within your reach. Each step isn’t complicated, but they do take some patience and care. In the end you’ll be handsomely rewarded with each golden bite!

homemade vegan potato gnocchi on a plate

What is gnocchi?

In Italian Cuisine, gnocchi are dumplings made from small lumps of dough. The most common gnocchi are made from potatoes, flour, eggs, and salt. But they can also contain herbs, vegetables, and cheese.

How to pronounce gnocchi-

Gnocchi, pronounced “nyow-kee” is the plural of gnocco, or a single gnocchi. Not that you could ever eat just one!

Is gnocchi vegan?

Gnocchi recipes will often include eggs and sometimes cheese, so they are vegetarian but not vegan. I use oil in place of eggs in this recipe to make it vegan-friendly and also to help the dough stick together.

Is gnocchi gluten-free?

The primary ingredient in gnocchi is potatoes. But, wheat flour is used as a binding ingredient in traditional gnocchi and is definitely not gluten-free. Not to worry though, you can easily replace wheat flour with a combination of gluten-free flours for gnocchi that rivals its wheat-based cousin.

vegan potato gnocchi served with pesto

The Ingredients

I’ve got the full list of ingredients and their amounts below, but let’s take a closer look at each one

Golden potatoes- such as Yukon Gold with their nutty tasting yellow flesh have a similar taste and texture to the potatoes used in Italy by gnocchi masters. Russet potatoes will do in a pinch, but their high starch content and powdery texture are harder to work with, often resulting in overworked rubbery gnocchi.

Oat Flour- does a lovely job of absorbing moisture, binding the potatoes, and imparting a rustic favor. You can buy oat flour or make your own by blending regular rolled oats in a high-powered blender.

Tapioca Starch- This is a key ingredient! Also called tapioca flour, it magically binds the dough while improving the overall texture. The results are light gnocchi that are never dense or gummy.

Olive Oil- A good quality olive oil such as extra virgin olive oil, adds depth of flavor and helps the dough stick together, making it easier to roll out.

Kosher Salt- Please don’t skip the salt! It only takes ½ teaspoon of salt to make the flavors pop. I recommend using Diamond Crystal Kosher Salt.

Tips and Tricks:

Bake, don’t boil the potatoes- Water is the enemy of gnocchi dough. Begin by poking a few holes in each potato and baking them on a tray (not directly on the rack). Fully cooked potatoes will feel soft, and the skin will split when pressed.

Use a potato ricer- to press peeled potatoes into fuffy little crumbles. If you don’t have a potato ricer, use a fork. Place the potatoes on a rimmed baking sheet. Break them into small chunks and mash each piece with the back of a fork until light and fluffy. Click here to see the potato ricer I use.

Use a wooden spoon- to mix the flour and oil into the potatoes. This gently incorporates the ingredients without making the dough tough. Work the last bit of flour into the dough by kneading it until smooth, trying not to over work the dough. After this, you most likely won’t need to dust additional flour on your rolling surface which can make the dough dry and crack.

Don’t overcrowd the pan! - Pat your cooked gnocchi with a kitchen towel and pan fry in a hot, but not smoking hot, pan that is coated in olive oil. Do this in batches with enough room so the gnocchi aren’t touching. A crowed pan will steam the gnocchi instead of frying it.

Use a gnocchi board or fork to shape the gnocchi. - The little grooves in gnocchi carry out the important task of clinging to your sauce. And they look so cute! Roll each gnocchi over the grooves on a board or over the tines of a fork that has been flipped over on a cutting board. You can certainly skip this step if you’re running short on time or patience.

Serving Suggestions

Toss with Stinging Nettle Pesto for a flavorful weeknight dinner.

Use in place of pasta in Vegan Mushroom Stroganoff as a holiday main dish.

Enjoy with The Best Vegan Bolognese for a meal that rivals any restaurant.

Sprinkle with coarse sea salt and enjoy plain.

Keep scrolling for step-by-step instructions and photos!


Ingredients for Gluten-Free Gnocchi

Serves 4

ingredients for homemade vegan potato gnocchi
  • 1½ pounds (680g) of golden potatoes (scrubbed and whole)

  • ½ cup (60g) oat flour

  • ¼ cup (30g) tapioca starch

  • 1 tablespoon of olive oil (plus more for pan-frying)

  • ½ teaspoon of kosher salt

  • Salted water for cooking


How to make Gluten-Free Gnocchi

1.-Bake the potatoes: Line a baking tray with parchment paper to cook your whole potatoes on. Poke several holes in each potato with a fork. Bake in a 425 F (218 C / gas mark 7) for 45-60 minutes (larger potatoes may take longer). Check to see if they’re done after 45 minutes by giving then a squeeze. Fully cooked potatoes will feel soft, and the skin will split when pressed.

2. Rice the potatoes: When the spuds are cool enough to handle but still warm, carefully peel off the skin. Break them into a few pieces and press them through your potato ricer. If you don’t have a potato rice, use a fork to mash and fluff the potatoes. Another option is to use a food mill or a potato masher, but these tend to compact the potatoes instead of fluffing them up. In the end, you want tiny crumbles of potatoes for light, pillowy gnocchi.

3. Make the dough: Scoop the potatoes into a large mixing bowl. Whisk the flours and salt in a separate bowl. Sprinkle ¾ of the flour over the potatoes and fold it in with a wooden spoon. Look for dough that holds its shape when squeezed together but is not sticky or crumbly. Pour the olive oil over the dough and gently mix it in. Now sprinkle in the rest of the flour and, using your hands, lightly kneed to form a tidy ball. Add a light sprinkling of oat flour if the dough feels sticky and a sprinkle of water if it won’t hold together.

4. Shape the gnocchi: Divide the ball into 6 equal parts. Carefully roll each part into a rope that is ¾” thick. If the rope breaks, forge ahead and make 2 smaller ropes. Cut the ropes into ¾” pieces. The gnocchi are ready to cook or freeze at this point. But you can add little ridges to your gnocchi by rolling each piece over a gnocchi board or the tines of the back of a fork. These not only look cute but carry out the important task of clinging to the sauce.

5. Cook the gnocchi: Bring 2 quarts of water with 2 tablespoons of kosher salt to a rolling boil. Plop half of the gnocchi into the water. It will sink to the bottom and then slowly begin to rise to the top in about 2 minutes. Once it floats, you know it’s fully cooked. Use a slotted spoon to scoop the gnocchi onto a kitchen towel. Bring the water back to a boil and repeat this process with the other half. Serve straight away with your favorite sauce or fry the gnocchi first and then serve.

6. Pan-fry the gnocchi: For gnocchi that is lightly crisp on the outside and pillowy soft on the inside, pan-fry them over medium-high heat in a tablespoon of olive oil until each side is golden brown. Serve with a sauce or enjoy with a sprinkling of coarse sea salt.


Storage:

Store uncooked gnocchi in the fridge for up to a week or in the freezer for 3 months. Store cooked gnocchi in the fridge for up to a week and gently reheat in the microwave or on the stovetop.

Cook frozen gnocchi using the same method as fresh. There’s no need to thaw the gnocchi first, just know it will take longer to cook.

homemade vegan potato gnocchi on a plate

If you like this recipe, please leave a 5-star rating on the recipe card below. Your ratings and comments mean the world to me, thank you!

And just for you, receive a gorgeous FREE e-cookbook by subscribing to my newsletter! Click here for delicious weekly recipes and your e-cookbook.

Yield: 4 Servings
Author: Carol Clayton
Homemade Vegan Potato Gnocchi

Homemade Vegan Potato Gnocchi

( 0 reviews )
Learn how to make Homemade Vegan Potato Gnocchi like an Italian grandmother! This impressive dish is made from just 5 ingredients and tastes light, pillowy, and flavorful. Best of all it’s freshly made without any preservatives, eggs, or gluten!
Prep time: 30 MinCook time: 1 H & 15 MTotal time: 1 H & 45 M

Ingredients

Instructions

  1. Bake the potatoes: Line a baking tray with parchment paper to cook your whole potatoes on. Poke several holes in each potato with a fork. Bake in a 425 F (218 C / gas mark 7) for 45-60 minutes (larger potatoes may take longer). Check to see if they’re done after 45 minutes by giving then a squeeze. Fully cooked potatoes will feel soft, and the skin will split when pressed.
  2. Rice the potatoes: When the spuds are cool enough to handle but still warm, carefully peel off the skin. Break them into a few pieces and press them through your potato ricer. If you don’t have a potato rice, use a fork to mash and fluff the potatoes. Another option is to use a food mill or a potato masher, but these tend to compact the potatoes instead of fluffing them up. In the end, you want tiny crumbles of potatoes for light, pillowy gnocchi.
  3. Make the dough: Scoop the potatoes into a large mixing bowl. Whisk the flours and salt in a separate bowl. Sprinkle ¾ of the flour over the potatoes and fold it in with a wooden spoon. Look for dough that holds its shape when squeezed together but is not sticky or crumbly. Pour the olive oil over the dough and gently mix it in. Now sprinkle in the rest of the flour and, using your hands, lightly kneed to form a tidy ball. Add a light sprinkling of oat flour if the dough feels sticky and a sprinkle of water if it won’t hold together.
  4. Shape the gnocchi: Divide the ball into 6 equal parts. Carefully roll each part into a rope that is ¾” thick. If the rope breaks, forge ahead and make 2 smaller ropes. Cut the ropes into ¾” pieces. The gnocchi are ready to cook or freeze at this point. But you can add little ridges to your gnocchi by rolling each piece over a gnocchi board or the tines of the back of a fork. These not only look cute but carry out the important task of clinging to the sauce.
  5. Cook the gnocchi: Bring 2 quarts of water with 2 tablespoons of kosher salt to a rolling boil. Plop half of the gnocchi into the water. It will sink to the bottom and then slowly begin to rise to the top in about 2 minutes. Once it floats, you know it’s fully cooked. Use a slotted spoon to scoop the gnocchi onto a kitchen towel. Bring the water back to a boil and repeat this process with the other half. Serve straight away with your favorite sauce or fry the gnocchi first and then serve.
  6. Pan-fry the gnocchi: For gnocchi that is lightly crisp on the outside and pillowy soft on the inside, pan-fry them over medium-high heat in a tablespoon of olive oil until each side is golden brown. Serve with a sauce or enjoy with a sprinkling of coarse sea salt.

Notes

Storage:

Store uncooked gnocchi in the fridge for up to a week or in the freezer for 3 months. Store cooked gnocchi in the fridge for up to a week and gently reheat in the microwave or on the stovetop.


Cook frozen gnocchi using the same method as fresh. There’s no need to thaw the gnocchi first, just know it will take longer to cook.


For step-by-step instructions with photos, see blog post!

Nutrition Facts

Calories

247.48

Fat (grams)

5.02

Sat. Fat (grams)

0.76

Carbs (grams)

46.09

Fiber (grams)

4.71

Net carbs

41.38

Sugar (grams)

1.45

Protein (grams)

5.64

Sodium (milligrams)

303.81

Cholesterol (grams)

0

Nutritional information is provided as a courtesy and is an estimate only. This information comes from online calculators.

Did you make this recipe?
Tag @vegeta.full on instagram and hashtag it # feedpeopleplants

Savory Chickpea Nettle Pancakes

Savory Chickpea Nettle Pancakes  / Vegan, Gluten-Free

Dig into pancakes for dinner! These savory chickpea nettle pancakes are made with protein-rich chickpea flour and nutritious stinging nettles. They are fluffy, flavorful, and filling. Topped with juicy tomatoes and creamy avocado, you’ll want to eat pancakes every night!

Jump To Recipe


savory chickpea nettle pancakes

When my youngest 2 daughters were still in grade school, we went on this crazy pancake kick and made pancakes every morning. We had the timing down to a science. It became a matter of pride to have all three of us in our cozy (aka small) kitchen, prepping like clockwork, so we could get out the door for school on time, with a full belly and no burns. This ritual went on for a few months. Sometimes we would even make pancakes for dinner which lovingly was coined “brinner” (breakfast + dinner, obvs). Our kids are all grown up now, but Todd and I still enjoy the simple pleasure of pancakes for dinner. So, I’m super excited to share what’s been on our plates this spring; savory chickpea pancakes…with nettles!  

Yup! These gluten-free pancakes are savory, make from chickpea flour with a generous addition of blanched stinging nettles. Chickpea pancakes are a lot like my socca bread recipe which is equal parts chickpea flour and water, mixed with herbs, and cooked or baked like a pancake. The difference here is that, unlike socca, these savory pancakes are fluffy. Like, stack ‘em high fluffy. And that, my friends, comes down to one simple trick, vegan buttermilk.

savory chickpea nettle pancakes

How do you make savory pancakes fluffy?

Chickpea flour is dense and can taste heavy without a little help but is my first choice for savory pancakes. It’s high in protein, gluten-free, and very filling. I tested this recipe with plain soy milk, plain almond milk, then almond milk mixed with lemon juice, and finally almond milk mixed with apple cider vinegar (acv). My last test made the fluffiest pancakes. To make vegan buttermilk, mix almond milk with acv and let it sit for about 5-10 minutes. You’ll see it start to curdle. When mixed into the dry ingredients, the buttermilk reacts with the baking powder, creating wee air pockets which poof up the batter and result in fluffy pancakes. (See recipe for amounts.)

savory chickpea nettle pancakes

How do you make nettles safe for eating?

It’s actually super simple to make stinging nettles safe for eating. You’ll thank yourself once you’ve tried it because nettles are heavenly. To deactivate the stingers, blanch the leaves and tender stems by plunging them in rapidly boiling salted water for 60 seconds. Then drain in a colander and run some cold water over them. I’ve ditched the ice bath that follows blanching to save time and another bowl because cold water works just as well. Gather the nettles, which are now safe to touch, in your hands and squeeze all the excess water out of them. The water will be a surprising shade of dark green or purple. Form the nettles into a ball which you can use right away or wrap them in plastic and store in the freezer for up to 6 months. I’ve got a whole blog post on foraging for and cooking stinging nettles which you can read here.

A word of caution: Do NOT eat stinging nettles raw. They will sting your skin and the inside of your mouth. The stingers must be deactivated before eating.

savory chickpea nettle pancakes

Serving suggestions:

Customize the toppings to your heart’s delight just like with sweet pancakes! I like to pair a creamy topping with some texture. Here’s what I’ve found flavorful and inviting.

savory chickpea nettle pancakes

These savory pancakes have all the good feels of breakfast pancakes with all the nutrition you want for dinner, they’re:

  • Protein-rich

  • Gluten-free

  • Filling

  • Savory

  • Fluffy

  • Nutrient-Dense

  • Vegan

  • Flavorful

“Brinner” has been a well-loved meal in our household ever since that crazy pancake kick because who doesn’t love breakfast all day long?!

savory chickpea nettle pancakes

Keep scrolling for step-by-step instructions with photos!


Ingredients for Savory Chickpea Nettle Pancakes

Makes (8) 4” pancakes (¼ cup of batter for each pancake)

ingredients for savory chickpea nettle pancakes
  • 3 packed cups (45 g) of stinging nettles, blanched, squeezed dry, and finely chopped (click here for instructions)

  • 1¼ cups (296 ml) of unsweetened almond milk

  • 1 tablespoon of apple cider vinegar

  • 1¼ cups (150 g) chickpea flour (garbanzo bean flour)

  • 2 tablespoons of nutritional yeast

  • 2 teaspoons of coconut sugar

  • 1½ teaspoons of baking powder

  • 1 teaspoon of kosher salt

  • 1 teaspoon of garlic powder

  • 1 teaspoon of onion powder

  • ¼ teaspoon of turmeric (optional for color)

  • A few twists of black pepper to taste


How to make Savory Chickpea Nettle Pancakes  

blanched stinging nettles

1. Preheat a large cast iron or heavy bottomed skillet over medium-high heat. When a drop of water sizzles on the skillet, it’s ready for a light coating of oil. You want the pan hot but not smoking hot.  Alternatively, use a non-stick frying pan for oil-free.

2. Grab a 4-quart pot and fill it with 2 quarts of water seasoned with 1 tablespoon of salt. Bring to a boil. Blanch the stinging nettles by plunging them in the rapidly boiling water for 60 seconds only. (Use gloved hands and tongs to handle them!) This deactivates the stingers and makes them safe for eating. Drain the nettles in a colander and rinse them in cold water. (You can also plunge them into an ice bath, but I find cold water does the trick.) Gather the nettles in your hands and squeeze out all the extra water by forming them into a tidy round ball. Finely chop them. You can read all about making nettles safe for eating in this blog post here.


ingredients for savory chickpea nettle pancakes

3. It’s time to make the buttermilk. In a small bowl or measuring pitcher, combine the almond milk and apple cider vinegar, give it a good stir, and set it aside to curdle while you mix your dry ingredients.

4. Whisk the chickpea flour, nutritional yeast, coconut sugar, baking powder, salt, garlic and onion powders, optional turmeric, and pepper in a medium mixing bowl.


making savory chickpea nettle pancakes batter

5. Give the buttermilk another stir and pour it over the dry ingredients. Whisk it into a smooth batter. There’s no gluten here so take the time you need to mix thoroughly. Taste for saltiness and add more if needed.  


savory chickpea nettle pancakes batter

6. Sprinkle in the nettles and stir to combine.


savory chickpea nettle pancakes on a skillet

7.  Scoop ¼ cup of batter onto the hot skillet, forming a circle. A large skillet will hold 4 pancakes. Cook for 4 minutes or until it looks dry on the top and golden on the bottom. You can peek under the pancake to see if it’s golden by lifting the edge with a spatula. Flip the pancakes over and cook the other side for 4 minutes as well. Repeat this once more with the rest of the batter. (See note)

savory chickpea nettle pancakes on a skillet

8. Hold on a warm plate until ready to serve. Garnish with your choice of toppings and dig in!

savory chickpea nettle pancakes

Notes:

1. To create perfectly round pancakes, I used 4” silicone pancake rings.  But really you can pour the batter onto the skillet and let the shape evolve how it pleases. Both will taste equally delish. Just be sure to space the pancakes out so they don’t play bumper cars!

2. Feel free to swap out the nettles for the same amount of blanched kale leaves, finely chopped, or 1 large handful of chopped fresh spinach. Or, skip the greens altogether.

3. Toppings. These pancakes pair well with a creamy topping such as sour cream, guacamole, or hummus. I really enjoy juicy cherry tomato halves on top too. Todd loves dipping his pancakes in salsa for a spicy kick! 

Storage:

These pancakes are best eaten hot off the griddle. If you do have leftovers, store them in an airtight container in the fridge so they don’t dry out. Reheat in the microwave for soft pancakes or in the toaster for a crispy exterior.


savory chickpea nettle pancakes

If you like this recipe, please leave a 5-star rating on the recipe card below. I always appreciate your feedback and hearing about your creations! For more yummy vegan recipes, you can follow along on Instagram, Pinterest, Facebook, and Tiktok. I also send out a weekly newsletter with my latest recipes and upcoming cooking classes. Subscribe here and receive a FREE e-cookbook!

Yield: 8 (4") Pancakes
Author: Carol Clayton
Savory Chickpea Nettle Pancakes

Savory Chickpea Nettle Pancakes

( 0 reviews )
Dig into pancakes for dinner! These savory chickpea nettle pancakes are made with protein-rich chickpea flour and nutritious stinging nettles. They are fluffy, flavorful, and filling. Topped with juicy tomatoes and creamy avocado, you’ll want to eat pancakes every night!
Prep time: 15 MinCook time: 20 MinTotal time: 35 Min

Ingredients

Instructions

  1. Preheat a large cast-iron or heavy-bottomed skillet over medium-high heat. When a drop of water sizzles on the skillet, it’s ready for a light coating of oil. You want the pan hot but not smoking hot. Alternatively, use a non-stick frying pan for oil-free.
  2. Grab a 4-quart pot and fill it with 2 quarts of water seasoned with 1 tablespoon of salt. Bring to a boil. Blanch the stinging nettles by plunging them in the rapidly boiling water for 60 seconds only. (Use gloved hands and tongs to handle them!) This deactivates the stingers and makes them safe for eating. Drain the nettles in a colander and rinse them in cold water. (You can also plunge them into an ice bath, but I find cold water does the trick.) Gather the nettles in your hands and squeeze out all the extra water by forming them into a tidy round ball. Finely chop them.
  3. It’s time to make the buttermilk. In a small bowl or measuring pitcher, combine the almond milk and apple cider vinegar, give it a good stir, and set it aside to curdle while you mix your dry ingredients.
  4. Whisk the chickpea flour, nutritional yeast, coconut sugar, baking powder, salt, garlic and onion powders, optional turmeric, and pepper in a medium mixing bowl.
  5. Give the buttermilk another stir and pour it over the dry ingredients. Whisk it into a smooth batter. There’s no gluten here so take the time you need to mix thoroughly. Taste for saltiness and add more if needed.
  6. Sprinkle in the nettles and stir to combine.
  7. Scoop ¼ cup of batter onto the hot skillet, forming a circle. A large skillet will hold 4 pancakes. Cook for 4 minutes or until it looks dry on the top and golden on the bottom. You can peek under the pancake to see if it’s golden by lifting the edge with a spatula. Flip the pancakes over and cook the other side for 4 minutes as well. Repeat this once more with the rest of the batter. (See note)
  8. Hold on a warm plate until ready to serve. Garnish with your choice of toppings and dig in!

Notes

  1. To create perfectly round pancakes, I used 4” silicone pancake rings.  But really you can pour the batter onto the skillet and let the shape evolve how it pleases. Both will taste equally delish. Just be sure to space the pancakes out so they don’t play bumper cars!
  2. Feel free to swap out the nettles for the same amount of blanched kale leaves, finely chopped, or 1 large handful of chopped fresh spinach. Or, skip the greens altogether.
  3. Toppings. These pancakes pair well with a creamy topping such as sour cream, guacamole, or hummus. I really enjoy juicy cherry tomato halves on top too. Todd loves dipping his pancakes in salsa for a spicy kick! 

Storage

These pancakes are best eaten hot off the griddle. If you do have leftovers, store them in an airtight container in the fridge so they don’t dry out. Reheat in the microwave for soft pancakes or in the toaster for a crispy exterior.


For step-by-step instructions and photos, see blog post!

Nutrition Facts

Calories

105.72

Fat (grams)

1.85

Sat. Fat (grams)

0.13

Carbs (grams)

15.96

Fiber (grams)

5.03

Net carbs

10.94

Sugar (grams)

2.84

Protein (grams)

6.34

Sodium (milligrams)

436.8

Cholesterol (grams)

0

Nutritional information is provided as a courtesy and is an estimate only. This information comes from online calculators.

Did you make this recipe?
Tag @vegeta.full on instagram and hashtag it # feedpeopleplants

Vegan Shepherd’s Pie with Lentils

Vegan Shepherd’s Pie with Lentils / Gluten-Free

Jump To Recipe

This Vegan Shepherd’s Pie with Lentils is comfort food at its best! It’s made with protein-rich lentils and healthy vegetables all cooked in a rich and flavorful gravy, then topped with fluffy, creamy mashed potatoes and baked until golden. Perfect for St. Patrick’s Day or any cold weather dinner!


vegan shepherds pie with lentils

What is Shepherd’s Pie and where did it come from?

Shepherd’s Pie is one of Ireland’s most beloved dishes. Lore has it that it was an invention of frugal housewives, back in the 18th century, that were looking for a tasty way to put leftovers to good use. Recipes vary but have the same basic structure. A thick and meaty stew is topped with a crust of mashed potatoes and baked until golden. The result is the ultimate comfort food that is enjoyed by Irish and non-Irish alike!

This Vegan Shepherd’s Pie has the same hearty, flavor-packed filling, and fluffy mashed potato topping. To make it plant-based, we simmer lentils in a sticky onion, carrot, and celery base. Then we add bold flavor boosters like red wine, tamari, balsamic vinegar, and spices. It’s perfect for St. Patrick’s Day but satisfies anytime you’re craving savory comfort food.

vegan shepherds pie with lentils

Let’s take a look at the ingredients

Lentils-

Traditional Shepherd’s Pie is made with ground lamb. To make it hearty and full of protein, we use cooked lentils. If you’re not a fan of lentils, don’t worry, they absorb the bold flavors of the gravy and provide a “meaty” mouth feel. I use canned lentils in this recipe for simplicity, but feel free to use cooked brown or green lentils if you like. Avoid using red lentils because their soft texture will turn mushy instead of meaty.

Vegetables-

This Vegan Shepherd’s Pie recipe is loaded with vegetables. We start by cooking onions until they’re golden brown, add in lots of garlic (of course) and then layer the aromatics with carrots and celery. Adding green peas gives the pie a “cottage” feel to it and a hint of sweetness. The filling is then tucked under a blanket of creamy fluffy mashed potatoes and cooked until bubbly hot and golden.

vegan shepherds pie with lentils

Here’s a peek at some of the ingredients that really make the flavor in the filling come alive

Tamari (gluten-free soy sauce) creates an additional salt and umami layer.

Tomato Paste adds savory thickness and a hint of tang

Red wine brings the earthiness of the vegetables and lentils together. If you need to skip this ingredient, add a touch more balsamic vinegar.

Tahini is an important carrier of flavor, as the only fat in the filling, and makes the sauce extra creamy.

Worcestershire sauce is a traditional ingredient that adds a subtle yet bold flavor and a touch of sweetness.

Balsamic vinegar brightens and balances the dish.

vegan shepherds pie with lentils

Mashed Potatoes-

Here’s where the magic happens. The mashed potatoes create a creamy and filling yet fluffy crust that helps lock in the flavors of the pie as it bakes in the oven. Russet potatoes, with their high starch content and mild flavor, are the perfect choice for light, fluffy mashed potatoes.

It’s important to start with cold salted water when cooking the potatoes. That way the interior and exterior of the potato will cook at the same rate and have a salty flavor that is not overwhelmingly salty. Keep an eye on them when boiling. They will be ready for mashing when they’re fork-tender. If your potatoes are falling apart, they will taste waterlogged and mushy instead of fluffy and flavorful.  

For a full rundown on how to make the perfect mashed potatoes, check out my Vegan Roasted Garlic Mashed Potatoes recipe!

vegan shepherds pie with lentils

Can this recipe be made oil free?

Absolutely! The fat in this recipe comes from tahini and the vegetables are sauteed in water instead of oil. When making the mashed potatoes, simply swap out the vegan butter for coconut milk and skip the olive-oil drizzle on the top. I’ve tested it both ways with delicious results!

vegan shepherds pie with lentils

Whether you celebrate St. Patrick’s Day or not, you can enjoy tucking into this comforting dish all winter long! It’s:

  • Savory

  • Filling

  • Comforting

  • Hearty

  • Veggie packed

  • Plant-based

  • Gluten-free

  • Full of flavor

Even after 3 days of recipe testing, Todd and I both devoured 2 servings at dinner and looked forward to eating the leftovers for lunch the next day! I love the “cottage” feel to this rustic and flavorful pie that is a true winter comfort food.

vegan shepherds pie with lentils

Keep scrolling for step-buy-step instructions and photos!


Ingredients for Vegan Shepherd’s Pie

Shepherd’s Pie Filling

ingredients for vegan shepherds pie with lentils
  • 1 large onion (2 cups) diced

  • ½ teaspoon of kosher salt

  • Water for sautéing

  • 1 cup (237 mL) of vegetable broth

  • 2 tablespoons of all-purpose flour (use gluten-free if needed)

  • 1 tablespoon of tamari

  • 6 cloves of garlic, minced or pressed

  • 2 medium carrots (1 cup) medium diced

  • 2 celery stalks (1 cup) medium diced

  • 2 tablespoons of tomato paste

  • ½ cup of red wine

  • 1 can (15 oz / 425g) of lentil beans, drained and rinsed (1½ cups of cooked brown or green lentils)

  • 1 cup of frozen peas

  • 2 tablespoons of tahini

  • 1 bay leaf

  • 2 teaspoons of thyme

  • 1 teaspoon of sage

  • 1 teaspoon of sweet paprika

  • 1 teaspoon of vegan Worcestershire sauce

  • 2 teaspoons of balsamic vinegar

  • Salt and freshly ground pepper to taste


Mashed Potatoes

  • 2 pounds (907g) of Russet potatoes

  • 2 tablespoons (1 oz) of vegan butter (use 2 tablespoons of coconut milk as an oil-free option)

  • ¼ cup of lite coconut milk

  • Salted water for cooking the potatoes


How to make Vegan Shepherd’s Pie

cooked onions for vegan shepherds pie with lentils

Steps 1-2:

1. Make the Sheperd’s Pie filling: Preheat oven to 375 F / 190 C / Gas mark 5. Have an ungreased 2½ quart (10.5 X 7.5) baking dish ready.

2. Heat a large heavy-bottomed skillet over medium-high heat until a splash of water sizzles in the pan.  Add 3 tablespoons of water and your diced onions. Sprinkle with salt. Sauté until soft, translucent, and slightly golden, 7-10 minutes. Add water, 1 tablespoon at a time, if the onions begin to dry out.


cooked onions and garlic for vegan shepherds pie with lentils

Steps 3-4:

3. While the onions are cooking whisk the vegetable broth, flour, and tamari in a small bowl or measuring cup. Set aside.

4. Add the garlic and sauté until fragrant, 1 minute more.


cooked vegetables for vegan shepherds pie with lentils

Steps 5-6:

5. Now add the carrots, celery, a few twists of freshly ground black pepper, and sauté until tender, about 5-7 minutes. Add water, 1 tablespoon at a time, if the veggies begin to dry out.

6. Scooch the veggies to the sides of the pan and plop in the tomato paste. Cook it for a few minutes to mellow the flavor, then mix it into the vegetables.


deglazing with wine for vegan shepherds pie with lentils

Step 7:

7. Pour in the wine, deglazing the pan and scraping up any brown bits that are sticking to the bottom. Continue to cook until it no longer smells like alcohol and the liquid is mostly absorbed, about 3 minutes.


cooked filling for vegan shepherds pie with lentils

Step 8:

8. Give the veggie broth mixture a stir and pour it over the sauteed veggies. Add the lentils, peas, tahini, bay leaf, thyme, sage, paprika, and Worcestershire sauce. Stir to combine all the ingredients and bring to a gentle simmer. Add the balsamic vinegar and season to taste with salt, black pepper and more vinegar, if needed, to give it a zing. Turn the heat down to medium-low and let the filling gently simmer away while you make the mashed potatoes.  


cooked potatoes in a pot

Steps 9-10:

9. Make your mashed potatoes. Peel the Russet potatoes, rinse them under cold water, and cut them into eighths.

10. In a large 4-quart cooking pot, add 2 tablespoons of kosher salt to 2 quarts of cold water. Slide in your potatoes and turn the heat on high. Once the water is boiling cook the potatoes until they are fork-tender but not mushy and falling apart, about 7-9 minutes.


fluffy vegan mashed potatoes in a pot

Step 11:

11. Drain the potatoes in a colander until they look dry. Back in the pot they go with the vegan butter. Wait until the butter is mostly melted and add the lite coconut milk. Give the potatoes and milk a stir before you start mashing. Use an immersion blender to blend it all up into a creamy mass. Check for seasoning and add salt to taste.

Note: you can use a handheld potato masher if you don’t have an immersion blender.


12. Assemble the Shepherd’s Pie. Remove the bay leaf and scoop the filling into the baking dish and smooth out the top. Then scoop large spoonfuls of mashed potatoes and place them gently over the filling so that the top is evenly covered. Carefully spread the mashed potatoes into your favorite pattern and drizzle with olive oil, if you like, for a crispier top.


Steps 13-14:

13. Bake for 20-30 minutes until the crust is beginning to brown and the filling is happily bubbling away. Place under the broiler for 3 minutes to further brown the top, checking after 2 minutes for burning.

14. Let the pie cool until it is a reasonable temperature to eat and has a chance to thicken, 15-20 minutes. Garnish with fresh thyme leaves and enjoy!


Storing:

Store leftovers in the refrigerator for up to a week or in the freezer for 2-3 months.

vegan shepherds pie with lentils

If you like this recipe, please leave a 5-star rating on the recipe card below. I always appreciate your feedback and hearing about your creations! For more yummy vegan recipes, you can also follow along on Instagram, Pinterest, Facebook, and Tiktok. I also send out a weekly newsletter with my latest recipes and upcoming cooking classes. Subscribe here to receive a FREE e-cookbook!


Yield: 6 servings
Author: Carol Clayton
Vegan Shepherd’s Pie with Lentils / Gluten-Free

Vegan Shepherd’s Pie with Lentils / Gluten-Free

( 0 reviews )
This Vegan Shepherd’s Pie with Lentils is comfort food at its best! It’s made with protein-rich lentils and healthy vegetables all cooked in a rich and flavorful gravy, then topped with fluffy, creamy mashed potatoes and baked until golden. Perfect for St. Patrick’s Day or any cold-weather dinner!
Prep time: 30 MinCook time: 1 HourTotal time: 1 H & 30 M

Ingredients

Shepherd’s Pie Filling
Mashed Potatoes

Instructions

Make the Sheperd’s Pie filling
  1. Preheat oven to 375 F / 190 C / Gas mark 5. Have an ungreased 2½ quart (10.5 X 7.5) baking dish ready.
  2. Heat a large heavy-bottomed skillet over medium-high heat until a splash of water sizzles in the pan. Add 3 tablespoons of water and your diced onions. Sprinkle with salt. Sauté until soft, translucent, and slightly golden, 7-10 minutes. Add water, 1 tablespoon at a time, if the onions begin to dry out.
  3. While the onions are cooking whisk the vegetable broth, flour, and tamari in a small bowl or measuring cup. Set aside.
  4. Add the garlic and sauté until fragrant, 1 minute more.
  5. Now add the carrots, celery, a few twists of freshly ground black pepper, and sauté until tender, about 5-7 minutes. Add water, 1 tablespoon at a time, if the veggies begin to dry out.
  6. Scooch the veggies to the sides of the pan and plop in the tomato paste. Cook it for a few minutes to mellow the flavor, then mix it into the vegetables.
  7. Pour in the wine, deglazing the pan and scraping up any brown bits that are sticking to the bottom. Continue to cook until it no longer smells like alcohol and the liquid is mostly absorbed, about 3 minutes.
  8. Give the veggie broth mixture a stir and pour it over the sauteed veggies. Add the lentils, peas, tahini, bay leaf, thyme, sage, paprika, and Worcestershire sauce. Stir to combine all the ingredients and bring to a gentle simmer. Add the balsamic vinegar and season to taste with salt, black pepper, and more vinegar, if needed, to give it a zing. Turn the heat down to medium-low and let the filling gently simmer away while you make the mashed potatoes.
Make the mashed potatoes
  1. Peel the Russet potatoes, rinse them under cold water, and cut them into eighths.
  2. In a large 4-quart cooking pot, add 2 tablespoons of kosher salt to 2 quarts of cold water. Slide in your potatoes and turn the heat on high. Once the water is boiling cook the potatoes until they are fork-tender but not mushy and falling apart, about 7-9 minutes.
  3. Drain the potatoes in a colander until they look dry. Back in the pot they go with the vegan butter. Wait until the butter is mostly melted and add the lite coconut milk. Give the potatoes and milk a stir before you start mashing. Use an immersion blender to blend it all up into a creamy mass. Check for seasoning and add salt to taste. Note: you can use a handheld potato masher if you don’t have an immersion blender.
Assemble the Shepherd’s Pie
  1. Remove the bay leaf and scoop the filling into the baking dish and smooth out the top. Then scoop large spoonfuls of mashed potatoes and place them gently over the filling so that the top is evenly covered. Carefully spread the mashed potatoes into your favorite pattern and drizzle with olive oil, if you like, for a crispier top.Bake for 20-30 minutes until the crust is beginning to brown and the filling is happily bubbling away. Place under the broiler for 3 minutes to further brown the top, checking after 2 minutes for burning.
  2. Let the pie cool until it is a reasonable temperature to eat and has a chance to thicken, 15-20 minutes. Garnish with fresh thyme leaves and enjoy!

Notes

Store leftovers in the refrigerator for up to a week or in the freezer for 2-3 months.


For step-by-step instructions and photos, see blog post!


Nutrition Facts

Calories

337.76

Fat (grams)

6.21

Sat. Fat (grams)

1.57

Carbs (grams)

57.16

Fiber (grams)

10.96

Net carbs

46.20

Sugar (grams)

6.59

Protein (grams)

12.30

Sodium (milligrams)

518.34

Cholesterol (grams)

0.00

Nutritional information is provided as a courtesy and is an estimate only. This information comes from online calculators.

Did you make this recipe?
Tag @vegeta.full on instagram and hashtag it #feedpeopleplants

Vegan Lasagna with Cheesy Cashew Cream

Vegan Lasagna with Cheesy Cashew Cream / Gluten & Oil Free

Jump To Recipe

This Vegan Lasagna with Cheesy Cashew Cream recipe is rich and cheesy, with layers of flavor you’re sure to love. The bechamel and cheese layer are combined into a cheesy cashew cream which is sandwiched between no-cook lasagna sheets, spinach, and a rich vegan ragu sauce. It’s surprisingly simple to make and perfect for holiday gatherings!


Vegan Lasagna with Cheesy Cashew Cream

Do you have a favorite holiday dish that you enjoy on Christmas Eve? One that you look forward to every year? In our house that would be lasagna. It’s super festive and fancy looking but can be made ahead of time and baked day of. This is very handy if your main meal, and food focus, is on Christmas Day. It also happily feeds a crowd, both young, and old and makes a-ma-zing-leftovers!

Vegan lasagna doesn’t have to be complicated to be delicious and this recipe’s proof of that. I’ve even got a shortcut option for you which uses store-bought marina to simplify the ragu sauce. Once you’ve got your cheesy cashew cream and vegan ragu made, layer up your lasagna and bake it, or pop it in the fridge to bake later!

Vegan Lasagna with Cheesy Cashew Cream

What makes this recipe both delicious and doable?

The pasta cooks in the lasagna not separately on the stovetop.

With all the moisture from the ragu, cashew cream, and spinach, the pasta cooks right in the sauce! This saves a step and keeps your pasta from sticking together during the layering process or getting mushy in the lasagna. Just be sure to tightly cover the lasagna pan top with foil, to seal in the juices.

The béchamel and cheese layers are combined into a cheesy cashew cream.

Traditional lasagna has a layer of bechamel (a rich white sauce made with milk) and a cheese layer. In this recipe, we combine the bechamel and cheese layers into one by making rich and cheesy cashew cream.

Cheesy Cashew Cream

You can swap out store-bought marinara sauce for the ragu sauce.

If you have a favorite marinara sauce and would like to use it instead, just swap one 25.5 - 28 oz. jar (722-790 grams / 3½ cups) for the canned tomatoes, tomato paste, balsamic vinegar, and coconut sugar.

Vegan Lasagna with Cheesy Cashew Cream

Can lasagna be made gluten-free?

Yes! Just use gluten-free pasta in this recipe. All the other ingredients are gluten-free

Vegan Lasagna with Cheesy Cashew Cream

Of all the vegan lasagna dishes I’ve made over the years, this one is the perfect balance of simplicity and deliciousness, and I can’t wait to serve it to my family on Christmas Eve!

Keep scrolling for step-by-step instructions with photos!


Ingredients for Vegan Lasagna with Cheesy Cashew Cream

Ingredients for the Cheesy Cashew Cream:

Vegan Lasagna with Cheesy Cashew Cream

How to make Cheesy Cashew Cream

Cheesy Cashew Cream ingredients in a blender cup

Steps 1-2:

1. Start by hot soaking your cashews. Place cashews in a small heat-proof bowl. Pour boiling water, enough to generously cover, over the cashews and let them soften for 10-20 minutes. When soft, drain off the soaking water and rinse the cashews. You can also cold soak your cashews in water overnight.

2. Add the soaked soy milk, nutritional yeast, lemon juice, apple cider vinegar, miso paste, garlic powder, and salt to a cup-style blender container. Let this sit while the cashews soak to make buttermilk. When ready to blend, add the soaked cashews.


Cheesy Cashew Cream

Step 3:

3. Securely attach the lid to the container and blend at high speed until the mixture is completely smooth with no cashew lumps remaining. This may take a couple of minutes, or more, depending on what type of blender you are using. I’ve had the best luck blending for 90 seconds using a Nutribullet.


Time saving tip! Make the ragu sauce while the cashews are soaking.

Ingredients for the Vegan Ragu Sauce:

ingredients for vegan ragu sauce
  • 8 oz. (227 grams) of cremini mushrooms (aka baby bella mushrooms) chopped

  • 1½ teaspoons of kosher salt (divided)

  • 1 medium sweet or yellow onion, small diced

  • 2 medium carrots, finely chopped

  • 4 garlic cloves, minced

  • 2 tablespoons of balsamic vinegar

  • 28 oz. (3½ cups / 800 grams) can of San Marzano tomatoes, pureed

  • 3 tablespoons of coconut sugar

  • 1 tablespoon of tomato paste

  • ½ teaspoon of freshly ground black pepper

  • ¼ cup of chopped fresh basil

Short cut! Use 1 25.5-28 oz. (722-790 grams) jar of marinara sauce in place of the balsamic vinegar, canned tomatoes, coconut sugar, and tomato paste.

ingredients chopped up for vegan ragu sauce

How to make Vegan Ragu Sauce

sautéed mushrooms for vegan ragu sauce

Step 1:

1. Add the chopped mushrooms to a 4-6 quart saucepan over medium-high heat. Sprinkle with 1 teaspoon of kosher salt. Sautee until most of the water is cooked out of the mushrooms and they have shrunk in size by about half. This will take around 5 minutes.


vegetable mixture for vegan ragu sauce

Steps 2-3:

2. Add the diced onion and carrots to the mushrooms and sprinkle with the remaining ½ teaspoon of salt. Continue to sauté until the onions are translucent and the carrots are soft, about 5-7 minutes. Add water, one tablespoon at a time, if the vegetables begin to dry out.

3. Stir in the garlic and cook until fragrant, one minute more.


ragu sauce for vegan lasagna

Steps 4-6:

4. Deglaze the pan with balsamic vinegar and pour in the pureed tomatoes. Add the coconut sugar, tomato paste, black pepper, and give it a stir. -OR- skip this step and pour a 25.5 - 28 oz. jar of marinara sauce over the vegetables and stir.

5. Simmer partially covered, to let the steam escape and to keep the sauce from spattering all over the stovetop, for 15 minutes.

Time-saving tip! Skip step 5 if using a jar of marinara sauce. This is also a good time to blend your cheesy cashew cream.

6. Turn off the heat and fold in the chopped basil. Season with salt, pepper, and coconut sugar to taste.


Ingredients for the Vegan Lasagna:

ingredients for Vegan Lasagna with Cheesy Cashew Cream
  • 1 recipe of Cheesy Cashew Cream (see above recipe)

  • 1 recipe of Vegan Ragu Sauce (see above recipe)

  • 9 lasagna sheets (7”x3” or 10”x2”) uncooked (use gluten-free if needed)

  • 2 cups of packed fresh spinach (about 1 large handful)

  • Vegan parmesan cheese and extra basil for garnish (optional) 


How to make Vegan Lasagna with Cheesy Cashew Cream

1. Preheat oven to 350 F / 180 C / gas mark 4

2. Grab a 7.5” x 10.5” (2.5 quart) ungreased baking dish and make 3 layers in this order:

ragu sauce in a lasagna pan

1- Ragu Sauce

Ragu sauce, 1 cup, evenly spread


lasagna sheets layered over vegan ragu sauce

2- Lasagna Sheets

3 lasagna sheets (uncooked) Snap the corners or ends off to fit your pan as needed.


cheesy cashew cream layered in vegan lasagna

3- Cheesy Cashew C

ream

Cheesy cashew cream, ½ cup, evenly spread


spinach layered in vegan lasagna

4- Spinach

Spinach, 2/3 cup, evenly sprinkled


Repeat this process to make 2 more layers:


Vegan Lasagna ready to bake

Step 3:

3. Spread the remaining ragu sauce over the top (you’ll have about one cup left).


baked Vegan Lasagna

Step 4:

4. Tightly cover the pan with foil, keeping the foil taught so it doesn’t touch the top of the lasagna. Bake, covered, for 35 minutes. Remove the foil, rotate the pan 180 degrees, and bake uncovered for 10 more minutes. Remove from the oven and let it rest for 15 minutes to cool and set up a bit.


Vegan Lasagna with Cheesy Cashew Cream

Step 5:

5. Drizzle the top with remaining cheesy cashew cream and sprinkle with vegan parmesan cheese and fresh basil. Slice and serve!


Storage:

Lasagna makes amazing leftovers! Store leftovers in the fridge for 5 days or in the freezer for 3 months. Let frozen lasagna come to room temperature before reheating.

Vegan Lasagna with Cheesy Cashew Cream

If you like this Vegan Lasagna with Cheesy Cashew Cream recipe, please give it a 5-star rating in the recipe card below, and lemme know how it turns out in the comments. Hearing from you always makes my day! And if you’re looking for more yummy vegan inspo, check out my Pinterest and Instagram Page!

Vegan Lasagna with Cheesy Cashew Cream
Yield: 8 Servings
Author: Carol Clayton
Vegan Lasagna with Cheesy Cashew Cream / Gluten & Oil Free

Vegan Lasagna with Cheesy Cashew Cream / Gluten & Oil Free

( 0 reviews )
This Vegan Lasagna recipe is rich and cheesy, with layers of flavor you’re sure to love. The bechamel and cheese layer are combined into a cheesy cashew cream which is sandwiched between no-cook lasagna sheets, spinach, and a rich vegan ragu sauce. It’s surprisingly simple to make and perfect for holiday gatherings!
Prep time: 20 MinCook time: 1 H & 15 MInactive time: 15 MinTotal time: 1 H & 50 M

Ingredients

Cheesy Cashew Cream:
Vegan Ragu Sauce:
Vegan Lasagna:

Instructions

How to make Cheesy Cashew Cream
  1. Start by hot soaking your cashews. Place cashews in a small heat-proof bowl. Pour boiling water, enough to generously cover, over the cashews and let them soften for 10-20 minutes. When soft, drain off the soaking water and rinse the cashews. You can also cold soak your cashews in water overnight.
  2. Add the soaked soy milk, nutritional yeast, lemon juice, apple cider vinegar, miso paste, garlic powder, and salt to a cup-style blender container. Let this sit while the cashews soak to make buttermilk. When ready to blend, add the soaked cashews.
  3. Securely attach the lid to the container and blend at high speed until the mixture is completely smooth with no cashew lumps remaining. This may take a couple of minutes, or more, depending on what type of blender you are using. I’ve had the best luck blending for 90 seconds using a Nutribullet.
How to make Vegan Ragu Sauce
  1. Add the chopped mushrooms to a 4-6 quart saucepan over medium-high heat. Sprinkle with 1 teaspoon of kosher salt. Sautee until most of the water is cooked out of the mushrooms and they have shrunk in size by about half. This will take around 5 minutes.
  2. Add the diced onion and carrots to the mushrooms and sprinkle with the remaining ½ teaspoon of salt. Continue to sauté until the onions are translucent and the carrots are soft, about 5-7 minutes. Add water, one tablespoon at a time, if the vegetables begin to dry out.
  3. Stir in the garlic and cook until fragrant, one minute more.
  4. Deglaze the pan with balsamic vinegar and pour in the pureed tomatoes. Add the coconut sugar, tomato paste, black pepper, and give it a stir. -OR- skip this step and pour a 25.5 - 28 oz. jar of marinara sauce over the vegetables and stir.
  5. Simmer partially covered, to let the steam escape and to keep the sauce from spattering all over the stovetop, for 15 minutes. Time-saving tip! Skip this step if using a jar of marinara sauce. This is also a good time to blend your cheesy cashew cream.
  6. Turn off the heat and fold in the chopped basil. Season with salt, pepper, and coconut sugar to taste.
How to make Vegan Lasagna with Cheesy Cashew Cream
  1. Preheat oven to 350 F / 180 C / gas mark 4
  2. Grab a 7.5” x 10.5” (2.5 quart) ungreased baking dish and make 3 layers in this order: (1) Ragu sauce, 1 cup, evenly spread. (2) 3 lasagna sheets (uncooked) Snap the corners or ends off to fit your pan as needed. (3) Cheesy cashew cream, ½ cup, evenly spread. (4) Spinach, 2/3 cup, evenly sprinkled
  3. Spread the remaining ragu sauce over the top (you’ll have about one cup left).
  4. Tightly cover the pan with foil, keeping the foil taught so it doesn’t touch the top of the lasagna. Bake, covered, for 35 minutes. Remove the foil, rotate the pan 180 degrees, and bake uncovered for 10 more minutes. Remove from the oven and let it rest for 15 minutes to cool and set up a bit.
  5. Drizzle the top with remaining cheesy cashew cream and sprinkle with vegan parmesan cheese and fresh basil. Slice and serve!

Notes

Time-saving tip! Make the ragu sauce while the cashews are soaking.


Storage: Lasagna makes amazing leftovers! Store leftovers in the fridge for 5 days or in the freezer for 3 months. Let frozen lasagna come to room temperature before reheating.


For step-by-step instructions with photos, see blog post!

Nutrition Facts

Calories

300.21

Fat (grams)

12.89

Sat. Fat (grams)

4.00

Carbs (grams)

32.82

Fiber (grams)

5.71

Net carbs

27.12

Sugar (grams)

13.81

Protein (grams)

16.90

Sodium (milligrams)

396.11

Cholesterol (grams)

30.83

Nutritional information is provided as a courtesy and is an estimate only. This information comes from online calculators.

Did you make this recipe?
Tag @vegeta.full on instagram and hashtag it # feedpeopleplants